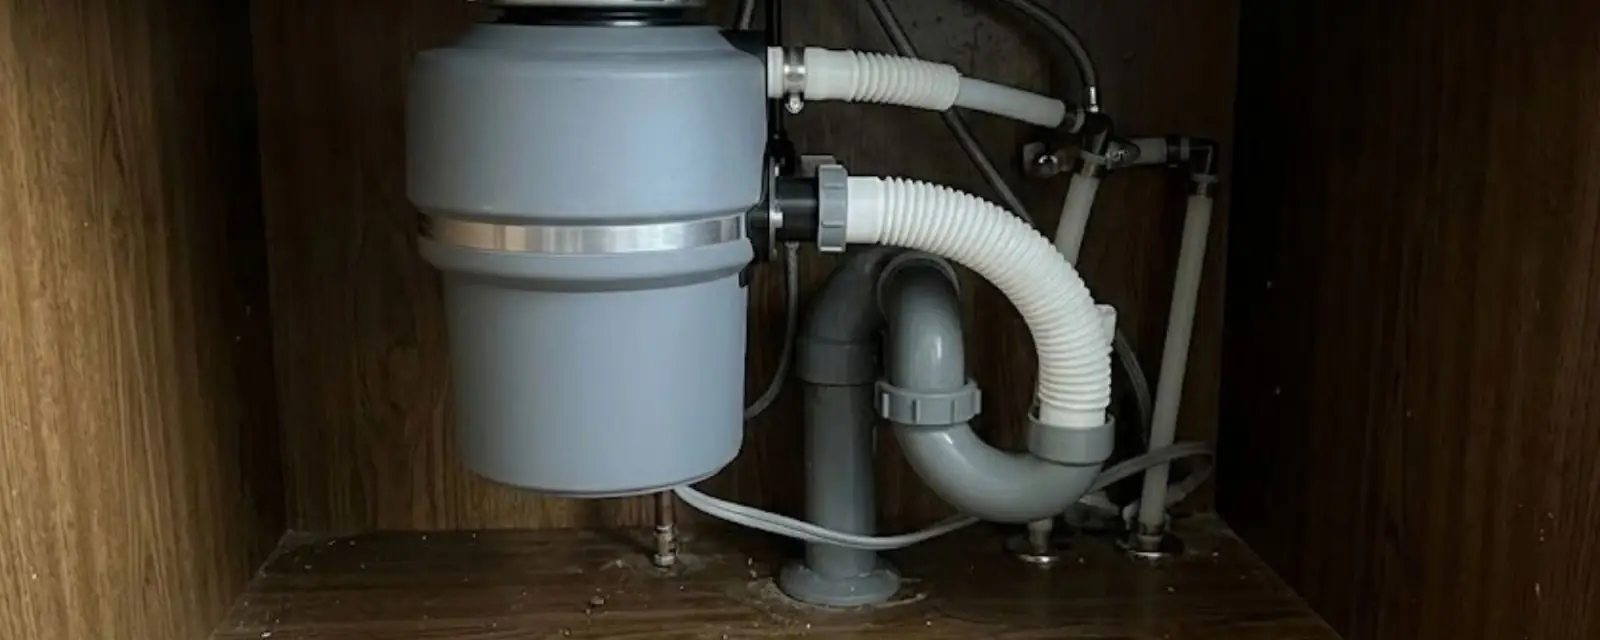
A disposal installation has four parts. The unit locks onto the sink flange with a mounting assembly, it gets power from a switch, its side port connects to the dishwasher if you have one, and its discharge tube joins the sink drain. Get those four right and the unit runs quietly for years.
Before anything else, turn the power off at the breaker panel. A wall switch is not enough, because the switch can be bumped back on while your hands are under the sink. This guide walks through each part in the order a plumber works, then covers what to do when the unit jams.
Most of the skill in this job is in the small details, such as the dishwasher plug people forget to knock out. Those are the details below.
The Installation in Five Stages
The order matters. Each stage sets up the next one, and skipping ahead is how leaks and dead units happen.
Power off and clear the cabinet.
Shut off the circuit at the panel, then confirm the old unit is dead before touching it. Empty the cabinet so you can see the flange, the drain and the outlet.
Remove the old unit.
Disconnect the drain tube and the dishwasher hose, then release the mounting ring and lower the unit. Scrape old putty from the sink opening.
Seat the flange and mount.
Set the new flange with fresh sealant, then attach the mounting assembly and the unit. Tighten evenly so the flange does not tilt.
Connect drain and dishwasher.
Join the discharge tube to the trap, then connect the dishwasher hose with the high loop or air gap the dishwasher instructions call for.
Power up and test.
Restore the circuit at the panel, run cold water, then run the unit while you watch every joint for drips.
Mount Types and What They Mean for Your Sink
Disposals attach to the sink in a few different ways. The style you pick changes how hard the unit is to remove later.
Bolt-style mount.
Three bolts draw an upper ring tight against the underside of the sink. It is sturdy and common, but it takes a screwdriver and some patience in a tight cabinet.
Quick-lock mount.
The unit twists onto a lower ring and locks with a partial turn. It is faster to swap and easier on your shoulders when you are working overhead.
Stainless and composite sinks.
Thin stainless sinks and some composite sinks flex under load. Check the sink maker's notes before drilling or tightening hard against the material.
Replacing an older unit.
A new disposal often does not use the same mount as the old one. Plan to replace the whole mounting assembly rather than reusing parts.
If you are matching an existing flange, bring the old unit's model details when you shop. The unit's horsepower, its feed type and its weight all affect which mount works.
Power Supply: Cord and Plug or Hardwired
A disposal gets its power one of two ways. The right choice depends on what is already in your cabinet and what the unit's instructions allow.
Cord and plug.
- Plugs into a receptacle inside the sink cabinet.
- Makes future replacement quick.
- Needs an outlet already wired to the right circuit.
- Cord must reach without strain or sharp bends.
Hardwired.
- Wires connect directly inside the unit's junction box.
- Common where no cabinet outlet exists.
- Needs a switch and wiring that suit the unit.
- Best handled with an electrician when new wiring is needed.
Whichever way you go, the unit should be on a circuit that suits its rating, switched from a convenient wall location. Read the installation instructions for the exact requirements, and call an electrician when the wiring itself needs changes.
A plumber can set the mechanical side of the job. New cabinet wiring or a new switch circuit is electrical work, and it is better planned before the day of installation.
Want a plumber to size up the sink first?
Call the dispatch line and describe your sink and your dishwasher. Same-day appointments are available when the schedule allows, and the price is clear before work starts.
The Dishwasher Knockout People Forget
Most disposals have a side port for the dishwasher drain hose. On a new unit, that port is blocked by a small plastic plug called a knockout. If you connect a dishwasher and skip this step, the dishwasher cannot drain, and water backs up into the machine.
Remove the plug with a screwdriver and a light tap of a hammer. The plug drops into the grinding chamber, so fish it out by hand with the power off at the panel, or the first run will hurl it around.
If no dishwasher connects to this sink, leave the knockout in place. A missing plug means water pours out of the open port when the unit runs.
Drain Connection, Trap and Slope
The disposal's discharge tube must meet the sink trap at the right height, and the trap arm needs a gentle downward slope to the wall. If the disposal sits lower than the old drain stub, a plumber can adjust the tailpiece or move the trap rather than forcing a bad angle.
Double sinks are the common trouble spot. With a disposal on one bowl, the other bowl usually joins through a continuous waste, and the connection needs to be tight and aligned. A sloppy joint here is the leak that shows up a week later.
The dishwasher drain hose should loop up high under the counter, or run through an air gap, as the dishwasher's instructions describe. That loop keeps sink water from siphoning back into the machine.
Rosemount: What You Flush and Grind Reaches the Same Pipe
The City of Rosemount publishes a do-not-flush list for its sewer system. It names wipes of any kind, including ones labeled flushable, as well as diapers, facial tissue, cotton balls and swabs, paper towels, cloth, kitty litter, dental floss and hair. The city adds that a flushable label does not mean a product breaks down.
That list is about the sewer, but the habit protects your disposal too. Hair, floss and fibrous scraps tangle, and your kitchen drain joins the same line as your toilets. Keep those items out of both drains.
The city also says homeowners own the private pipe from the house to the street sewer main. If a kitchen drain backs up because of a clog in that pipe, the repair is yours. A disposal is a good tool, but it does not replace careful habits at the sink.
Source: City of Rosemount Sanitary Sewer page (rosemountmn.gov/243/Sanitary-Sewer): do-not-flush list and homeowner ownership of the private pipe from house to street sewer main.
What Belongs in a Disposal and What Does Not
A disposal handles soft food waste in small amounts with cold water running. It is not a trash can. Use it for scraps from plates, small bits of cooked vegetables and soft leftovers, and let cold water run for several seconds after you switch it off.
Grease, oil and fat are the main enemy. They look harmless as a liquid, then cool and coat the pipe walls. Pour them into a can and throw the can away instead.
- Coffee grounds in large amounts, which settle and pack together.
- Eggshells and fibrous scraps such as celery or corn husks.
- Pasta and rice, which swell with water.
- Bones, fruit pits and anything hard.
- Cleaning wipes, paper towels and any non-food items.
None of these listed items is an instant disaster on its own. The trouble comes from repetition, which builds a slow clog in the trap and the line behind it.
If the Disposal Jams or Hums: Reset Without Risk
A humming unit that will not turn is usually jammed. Do not put your hand in the opening, even with the switch off.
- Cut power at the panel.Turn off the circuit at the breaker panel, not just the wall switch. This is the step that keeps your fingers safe.
- Free the blades from below.Insert the hex key that came with the unit into the socket at the bottom center. Work it back and forth until the shaft turns freely.
- Remove the cause from above.Use tongs or pliers, never your hand, to pull out whatever jammed it, such as a bottle cap or a fruit pit.
- Press the reset button.Wait a few minutes for the motor to cool. Press the red reset button on the underside, restore power at the panel, run cold water and test.
If the unit trips the reset again right away, the motor or the wiring has a problem. Leave it off and have a plumber look at it, since repeated resets can burn out the motor.
Quick Reference: Problems and Likely Causes
This table sorts the usual symptoms into what is happening and what to try first.
| Symptom | Likely cause | First move |
|---|---|---|
| Hums but blades do not turn. | Jam in the grinding chamber. | Power off at the panel, turn the shaft with the hex key. |
| Silent, no hum at all. | Tripped reset or dead supply. | Check the reset button, then the breaker. |
| Leak at the top of the unit. | Flange seal or mount. | Retighten the mount, then reseal the flange if needed. |
| Leak at the side port. | Dishwasher hose clamp. | Tighten the clamp or replace the hose. |
| Sink drains slowly. | Clog in the trap or the line. | Remove the trap and clear it, then run water. |
| Dishwasher fills the sink. | Knockout left in place or blocked port. | Power off, remove the plug from the port. |
Any persistent leak under the sink should be handled quickly, since cabinet floors soak and swell.
Doing It Yourself or Calling a Plumber
A confident homeowner can swap one disposal for another of the same type. If the mount, the drain height and the power connection all line up, the job takes an afternoon. Minnesota law allows an owner to do plumbing work on a home they live in, as long as it meets the plumbing standards.
Call a plumber when the drain needs to be changed, the sink is thin or oddly shaped, the dishwasher hose is a puzzle or the wiring needs work. For help with an existing unit, see our garbage disposal repair service. For a new unit that needs drain or supply changes, our plumbing installation work covers the rest of the kitchen.
Ask your city's Building Permits and Inspections office whether your project needs a permit, because we will not guess at a local rule. We also serve neighbors in Apple Valley and Hastings, and the same install steps apply there.
Care Habits That Make a Disposal Last
Run cold water before, during and after each use. Cold water keeps fats solid so the blades can chop them and the water can carry them down the line.
Feed scraps in small batches instead of one big handful. Overloading is the leading cause of jams and of motor strain.
Clean the unit now and then with a few ice cubes and a splash of dish soap, or a handful of citrus peel. Skip harsh drain chemicals, which can damage seals and are unsafe if you later open the trap.
Garbage disposal questions we hear
Turn it off at the panel. A wall switch can be flipped back on by accident while you are working under the sink, and a panel breaker cannot. Test that the unit is dead before you touch anything.
Septic tanks and disposals do not always get along, since grease and solids add to the tank load. Check the disposal maker's notes and your septic service before adding one. This is a question for the household and its septic provider, not a decision to make at the sink.
A jammed unit hums when you switch it on but the blades do not turn. A dead motor makes no sound at all. Try the reset button and the breaker, then turn the shaft with the hex key from below.
Only if a dishwasher drains through the disposal. Remove the plug from the dishwasher port and take it out of the chamber. If no dishwasher connects, leave the plug in place.
The city's do-not-flush list names wipes of any kind, diapers, facial tissue, cotton products, paper towels, cloth, kitty litter, dental floss and hair. Those items are about the sewer, but they clog a kitchen drain too. Keep them out of the disposal as well.
The city says homeowners own the private pipe from the house to the street sewer main. A clog in that pipe is the owner's to fix. The city handles the public main.
No. Stop using the sink and the unit. Running it only pushes more waste into a line that cannot take it, and it can overheat the motor.